


Decide on what best fits your needs before you order.
Many UK households are trying different hacks in order to stay warm without increasing their energy costs. One unique idea is bubble wrap.
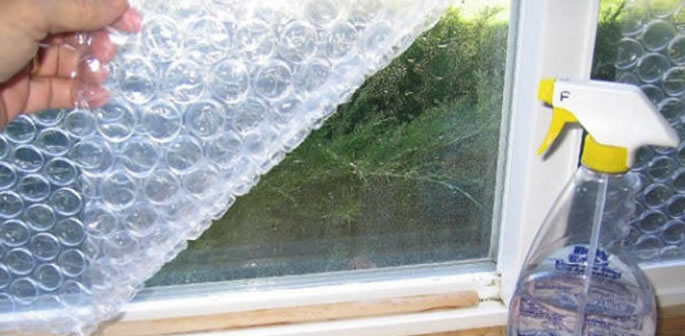
Using bubble wrap on your windows has been touted as a cheap way to save on heating bills.
The idea is to stop cool air from outside entering your home, while still allowing solar heat to pass through your windows.
While window insulators are available, a cheap alternative is bubble wrap.
According to reports, bubble wrap on a single-pane window can reduce heat loss by up to 50% as the bubbles serve as multiple insulating pockets filled with air.
On a double window, heat loss is estimated to be cut at around 20%.
Due to better heat retention, it reduces heating costs.
Bubble wrap on the roll is available in different widths (12 – 14 inches) and different lengths (125 – 175 feet).
In some cases, you may be able to find or order wrap in 250 – 350 feet lengths.
Decide on what best fits your needs before you order.
While some prefer to use pieces of used bubble wrap, it is recommended to use new wrap to get the best insulation value.
It is best to use wrap with larger bubbles and with a wider wrap, especially if you have larger windows.
Depending on your needs, you may opt for non-perforated bubble wrap because you need to cover taller windows.
If so, use a pair of sharp scissors (sharpen them, if necessary, before you begin cutting, to reduce tearing) to cut panels to fit.
If some of your windows are the same size, you can use the first piece you cut as a guide by placing it over the top of the long sheet and then cutting pieces to the same length.
When applying sheets to windows for the first time, trimming an edge isn’t problematic and can be done in seconds.
Sheets of bubble wrap are sturdier than the standard thin plastic in the window kits. Because the wrap has more stiffness, it is much easier to work with and cut than thin plastic that sticks together and sticks to you because of static.
When applying bubble wrap to windows, there are two main methods:
Method 1 (Spray Mixture)
- You need to have a spray bottle containing cold water mixed with a few drops of washing-up liquid. This spray mixture will help attach the bubble wrap to the window.
- Lightly spray the bubbled side of your cut panel. Start on the outer edges, then spray over the centre area. Make sure the entire surface is covered in mist.
- Place the bubble wrap over the window, with the bubbles facing and touching the window. Line it up at the top and align the straight edge along one side of the window.
- Using your palms, gently press the bubble wrap to the pane, and ensure it is stuck all the way down.
- You do not need to exert pressure. Doing so might result in bubbles bursting.
- If you need to move the panel over a tad, gently pull and pat it into place.
Method 2
- Using a damp cloth, wipe over the windows.
- Run the bubble side of your wrap under your tap, ensuring that the outer edges and all other areas are covered with water.
- Tilt and shake pieces of wrap over the sink to get rid of excess water.
- Apply panels to windows with the bubbles facing and touching the window.
Those who have applied bubble wrap to their windows have felt a noticeable increase in temperature.
This means less energy is required to heat up the home, thus reducing energy costs.
However, visibility is reduced due to the bubble wrap not being clear. So if you enjoy looking outside, it might be better to leave some windows clear.
Another con that bothers some people is that it does not look aesthetically pleasing.
But given the rising energy costs, temporarily sacrificing your home’s looks to save money is something to consider.